Thickness measurement is one of the main activities in manufacturing processes in industry and laboratory.
The choice of the appropriate equipment is essential to ensure the precision required in the production process. An effective way to accurately measure thickness is to use contact-friendly thickness gauges, also known as digital contact gauges or contact micrometers.
Contact thickness gauges are precise measuring instruments with a range of 0 to 300 millimeters (12″). They are equipped with touch probe systems that allow accurate and efficient thickness measurement. In addition, they offer the possibility of using standardized calibration materials as a reference for the most accurate measurements. Some brands such as RODER, Kaefer and Mitutoyo have developed state-of-the-art equipment that guarantees reliable performance in production and laboratory metrology.
The very versatile and efficient digital contact thickness gauges have a unique feature, i.e. the arm with different depths which allows you to carry out measurements in difficult to access situations such as acute angles indoors or outdoors. They are easy to use thanks to their intuitive interfaces with LCD displays and intuitively placed buttons.
RODER devices also offer innovative integrated features such as data storage on SD card, optional RS232/USB for PC or external printers and integrated Ethernet connectivity.
Thickness measurement systems are essential in both metrology laboratories and production lines. Contact digital units, such as micrometers and contact calipers, are essential tools for accurate thickness measurement.
A contact digital machine can be equipped with a transducer to act as a starting point. The transducer is able to generate a signal proportional to the distance between the surface of the material to be tested and the end point of the sensor.
Most of the instruments available on the market feature a high definition LCD display which shows the measured readings in analog or digital mode, allowing the operator to quickly acquire the data needed for analysis. In addition, most digital contact units also provide additional information on the direction and depth of the tested surface.
The use of contact digital units has become increasingly popular in industrial applications in recent years as they are proving to be increasingly valuable in thickness measurement in modern automated manufacturing.
Being equipped with a large number of advanced features, these units have made it possible to quickly obtain precise results when it comes to measuring thickness accurately in industrial production or standardized metrology laboratory.
The innovative technologies made available by the most advanced manufacturers have made the use of digitally controlled calibrations in the industrial field even more efficient.
Contact thickness gauges with a high insertion depth suitable for measuring the thickness of textile products, tapes, sheets or any sheet products. The presence of a large arch allows measurement in places that are difficult to access with traditional measuring instruments.
The presence on some models of a pressure system determined by a weight allows to accurately determine the pressure force on the sample and to keep the weight / measurement surface ratio constant.
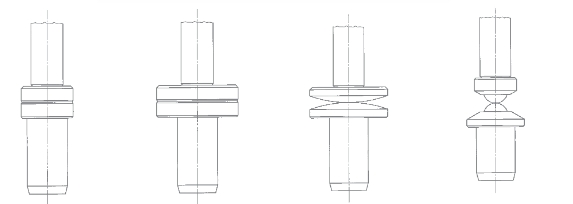
Pocket Dial thickness gauges are used to measure the thickness of a wide range of materials such as leather, cardboard, paper, felt, rubber, glass, sheet metal, metal, film, plywood and plastic. The shape of the contact points must be adapted to the material to be measured. If other contact points are required than the standard contact points, this must be indicated in the order. (Example: J 45 with spherical contact points).
Standard 6,35 mm flat contact points, unless otherwise specified in the order. The other three anvils listed below are available on request. The type of contact point does not affect the price of the dial thickness meter. Thickness gauges K 15, K 15, K 15/2, J 15, J 15 and J 45 with contact points of 10 or 14 mm Ø, ground at the bottom, are available at a surcharge. In this case the instrument is positioned flat on the table and is therefore the most suitable for batch measurements of small components.
- High number of models
- High precision
- Possibility of choosing the contact point
- Movement with adjustment wheel
